BoS Tools are a series of tools that can be accessed via a drop down menu that appears when you click on the button at the top right of your Lord of Ultima game.

The first three tools are calculators. The first is a combat calculator, which calculates the results of an attack between two players. The results are not completely accurate, since they are based on the attack and defence stats that are available in-game, not on the actual calculations that the game does behind the scenes, and they don't take into account research, but it can provide a good estimation.

In order to get a good estimation, however, the first three columns (Attacker, Defender and Defences) need to be filled out with reasonable accuracy. Some information can be filled automatically using the drop down box at the bottom of the actions box. The options in this box are:
- Defenders: Add troops in the current city (including supporting troops) to the Defender column
- Defences: Add wall and towers in the current city to the Defences column
- Defenders & Defences: Both of the above
- Attackers: Add troops owned by the current city (whether they are currently in the city or not) to the Attacker column
- Scout Report: All: Adds troops and wall/towers from a scout report to the Defenders and Defences columns
- Scout Report: Defences: Adds wall/towers from a scout report to the Defences column
Note that the only reports that can be imported are your own scout reports. Information from shared reports or from assault/siege/plunder reports must be added manually.
Once all the data is as accurate as you can make it, select the time the attack will hit under Actions, select the attack type (assault, siege, or plunder) and then hit Calc.
Above the Actions box, the total attack and defence values per troop type will be displayed. The modifier value takes into account night protection (in the attacker column) and morale (in the defender column) Next to each troop type in the Attacker and Defenders columns will be listed the number of units that are estimated to be lost. Only damage to troops, not towers or buildings, is calculated. Click on the Substract [sic] losses button to subtract the lost units from the totals so you can calculate another round (e.g., another siege wave). If you want to calculate a brand new attack, click on Clear All to reset all values to 0.
The next calculator is a food calculator. Unlike the combat calculator, the food calculator does not draw any information from your empire; it's a stand-alone calculator. It lets you calculate how much food a given number of troops need, or how many troops a given amount of food will feed.

To calculate the amount of food that is needed for a given number of troops, just enter the number of each type of troop, then click "Units to food". The amount of food required per hour will be displayed at the bottom-right of the pop-up.
To calculate the number of troops that a given rate of food production will feed, click on "Food to units", enter the food production per hour, and then click OK. Next to each troop type, the number of that type that could be fed is displayed. Note that while the units to food calculation works with multiple troop types, the food to units assumes that only one troop type is being fed. For a mixed-troop city, you'll have to do some maths yourself.
The third calculator is a recruitment speed calculator. It tells you how long it will take to recruit each troop type given a recruitment speed, or what recruitment speed you need to get to in order to recruit your troops in a certain amount of time.

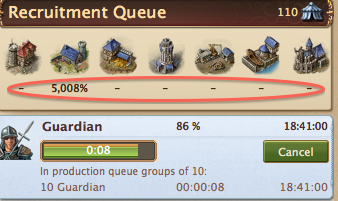
To calculate how long troops will take to recruit at a given recruitment speed, fill in the recruitment speed percentage for each building type. This information can be found under the recruitment queue, circled in red below.
Once the recruitment speed has been filled in, click on "Calculate" to update the recruitment times for each troop type.
For the reverse calculation, select the troop type you are interested in from the drop down menu, then click "Time to speed". Fill in the desired recruitment time and click on OK, and the recruitment speed for the relevant building type will be updated. Note that recruitment times are all in seconds and are by individual unit, not TS.
The "Clear" button will reset all recruitment speeds to 100%.
Below the three calculators are five Jump to... shortcuts:
- Jump to coords: Switches to region view and centres the view on the given coordinates (works with and without preceding zeros, i.e., 050:050 and 50:50 will take you to the same place)
- Jump to city: Opens the City Info window for the city at the given coordinates (again, works with and without preceding zeros)
- Jump to player: Opens the Player Info window for the player with the given name (not case-sensitive, but spelling must be correct)
- Jump to alliance: Opens the Alliance Info window for the alliance with the given name
- Jump to continent: Switches to region view and centres the view on the middle of the given continent
Then there is the Extra Summary. This opens a window with four tabs, each of which provides information which is not easily gathered with in-game functionality.
The first extra summary is the Player summary.

Simply enter a player name in the text box, then click on Refresh to update the information. The actual information is the same as is available in the Player Info screen, but with the ability to export the information in two different formats (note that as with the BOS summary, the exported data often appears behind other windows) and to filter and sort the displayed information. You can filter by minimum score (that's the unlabelled box with "0" in it in the screenshot), whether cities are land-locked or on water, and whether cities contain castles and/or palaces.
The Alliance tab is less useful; there are no filtering options, so the only advantage over the in-game Alliance Info screen is the ability to export.

The My Alliance tab is more useful. It includes all the information from the Member List (but all at once, so you don't need to toggle "Show Member Status" on and off) and allows export, but most usefully it includes the exact time of last login rather than just coding with green/yellow/red, so you can track when each alliance member is due to go lawless.

The Intelligence tab lets you make your own notes on cities (your own or other people's).

To add a note, click on "Add intel", fill in the city coordinates and click "Search". The city's player and name will be shown. Add your note in the description field and click OK. Your notes will be added to the table. The table can be filtered with four drop-down menus - player name, whether the city has a castle, whether it is land-locked or on water, and which continent it is on. The information is stored locally, so it is maintained between sessions, but to move it to another computer (or browser) you will need to Export settings on the old computer and then Import settings on the new computer.
The next two selections in the BOS Tools menu, Zoom Out and Zoom In, do as their names suggest. They work in City and Region view, but not World view, and only affect the map itself (unlike using the zoom function of your browser, which will also affect the UI).
The final selection on the BOS Tools menu is Fill with resources. This is related to the Fill with... button in the BOS Summary, but has different (and in my opinion more useful) functionality.

Unlike the Fill with... option on the Summary, it can only fill one city at a time, but the city can be yours or another players, and you have more control over what gets sent.
Select the resource type you want sent from the drop-down menu. Select the city you want to send to either by typing in the coordinates and then clicking on Search (you must click on Search whenever you change the coordinates), or by clicking on Current city to choose the city that you are currently looking at (the one in the drop-down menu at the top-left of your game, not the one selected in region view).
Max resources to send is the maximum total amount of resources you want send to the city. It defaults to the amount of empty space in your current city. If you click Current city for the To field, this value will be updated (it won't be updated if you type in coordinates). The buttons on the right allow you to increase the value in increments (the amount on the button is added to the current value, it does not replace it).
Max travel time specifies from how far away the tool will send resources; by default it is 24 hours.
You have the option of sending resources from the same continent, other continents, or both (if you unstick both boxes, nothing will be sent). You can also select whether to send via Palace delivery or not.
The main purpose for which I find Fill with resources useful is sending resources to palaces. It's a much quicker method than searching through all cities for ones with spare resources and carts/ships.
I doubt there's anyone out there who uses every function that BOS provides, but hopefully somewhere in the last two of these posts there's been a few things that are useful.
Continue to Part 4 for details of LoU Assistant
Continue to Part 4 for details of LoU Assistant
Awesome, thanks. Is there a way to stop certain individual cities from sending resources using the Fill With Resources Tool?
ReplyDeletethanks a lot...
ReplyDeletegreat summary thank you
ReplyDeleteThe only thing that I cant do is on combat calculator input my own scouting reports can you do a step by step guide as to how to make this work.
Thanks
Jed (queally4@btinternet.com) if anyone has a solution to this.